Friday, June 29, 2012

Last Little Project Before Guests Arrive

We pick up Dale's cousins tomorrow morning at 8:30 am - we have 2 adults and 2 little girls coming to stay with us, so it's going to be busy around here!  We've got the house all tidied up and ready to go, but I wanted to get one more little project done.  After getting the dutch door done, the rest of that window looked kind of sad, so I wanted to spruce up the shade and add some fun.

I took down the window shade and placed it on top of my fabric, a nice blue plaid.  OK, so my kitchen is yellow - ick - at least blue kind of goes with it.  (Ignore the ugly floor where I am spread out my fabric). I have a cute topper over the kitchen sink that I made, predominantly blue because it was in a blue bathroom at one time.  Anyway, I ironed the blue plaid fabric and then folded it over the shade, and ran it through the machine. 

Then I slipped in the lower bar and stitched the hem closed.  Easy enough.  Reattached it to the roller, and that was that.  When I hung it (with assistance of course), it looked....kind of bare.  I added a tassel (from my big bag of tassels!), but still,  it needed more. 

So I picked up a curtain rod and hung it above, then tore a bunch of strips of fabric and ribbon and half-hitched them over the rod.  This is what the topper over the sink looks like, so they match.


Ok, that'll do!  I do like this (even though the brackets don't match the rod, it's not that noticeable from the ground!  I had to use brackets that extended out from the door more than the ones that came with the rod); I'll probably do the same for the other two windows in the room later.

The shade is behind the fringe, ready to pull down on the hot late afternoon sun.  I was SO tempted to paint this room a cornflower blue today, but it was a hot afternoon and I had a 4 pm appointment to look at some doors on Craigslist (some french doors that might work to replace the slider in the living room).  I'm glad I didn't, I'd be exhausted right now.

OK, ready for company!

Wednesday, June 27, 2012

Little Stack Table No. 2

What the heck, I'm going to work on another one.  I decided last night that I would use up some of my decorative tins and metal scraps to cover the littlest table.  So I took it apart last night and got the legs painted so that this morning, I could just cut the tabletop and get started.  I cut the metal into random shapes and nailed them down to the plywood base.  After it was done, I used some black paint to "antique" it a bit - it helps pull the pieces together.


I didn't get any shots in progress, I had to go to my office to get the metal scraps and I was just enjoying the peace and quiet.  But, when I got home, I had to flip the top over to pound down all the nails and I knew I'd have to cover that mess with some fabric so my cats don't get their fur all stuck in there!

I had a scrap of corduroy so I turned the edges under and stapled it along the frame.
then I screwed the legs back on and brought it in to join the other table.


This one's pretty busy - but I like that style.  Dale will not be so happy with this, however.  I'm thinking that the last table, the biggest one, I'll do a mosaic top.


The cats approve!

Tuesday, June 26, 2012

Table Project

I bought this set of Ikea tables at a garage sale for 15 dollars.  It's a handy set of little side tables, but I never really liked the color of the bases, and the thickness of the tops.  I've been wanting to redo them for a while, so I thought maybe if I tackle one at a time I can get these done.  I don't really need them to match, so doing them at different times will give me the ability to think of different designs!


For the first one, I am redoing the middle table.  I have a bunch of yardsticks I inherited when I got my new job - because I also had about 2 dozen metal yardsticks, I decided these would be best liberated to work for my project.


The red one is actually a new one I got at Lowe's and tinted red with some acrylic paint.  I wanted a bit of color on this tabletop.  I started by taking the top off the table - turning it over, it was held on by 8 screws underneath.


After I took off the top, I removed the four plastic tips from the bottom of the legs, and used Krylon Satin spraypaint to paint it black.

 
I gave it several coats and let it dry all afternoon.  Meanwhile, I cut a piece of 3/4" plywood to fit the top.  The old one was flush with the sides, and that's what I wanted, so I measured and then subtracted the thickness of 2 yardsticks that I was going to use as a frame.

Then I cut my yardsticks on the chopsaw as I went.  I wanted a modified log cabin pattern, so I started in one corner and worked across.

While I was cutting the rulers, some of them were thicker than others, so I shimmed up the thinner ones with strips of the wooden blinds that I bought for the guest room.  Making the blinds fit to size, I had a lot of leftover wooden strips that I knew would come in handy for something - and they did!  When I got this part all done, I gave it two coats of spar varnish.

After it dried, I reattached the metal base to the wooden top, making sure it was centered correctly.  I cut strips of yardsticks to frame out the top, hiding all the cut edges.  And then I gave it two more coats of varnish.


Mercury approves!  He's wearing his harness, because I took him out on his leash this afternoon.

I'm thinking one the the other tops might look good with hammered metal from old tins.  I think I'll keep the bases all black, which will help make them work as a set.

Sunday, June 24, 2012

Vacationing


For the past few weeks, we've had a parade of visitors out - two of my daughters for a week each, and our best friends from Indiana for a week.  We got to visit and revisit a lot of Southern California fun spots - Disneyland, Hollywood --


my daughter cracking up at how serious the Storm Trooper was


And we discovered some new, interesting hidden spots.  Like the cemetery where Marilyn Monroe is interred - it's truly hidden away.

We were there the day after Ray Bradbury's funeral - fresh grass.  We visited the Getty -


With their beautiful site and gardens, and a stunning view of LA.

And we enjoyed having our visitors, playing games, eating and generally catching up.  It was great!  We have a week off, then our last group of the summer comes on Saturday for another week and a half.  More Disneyland and beach!  It'll be fun --

Because we've had so many visitors, we need more beds (especially for the group coming this week).  In the studio, I had a small red loveseat that I liked, but it didn't really help out much.  So I sold it on Craigslist and looked for a replacement that had a fold out bed.  I found a great leather loveseat with a twin sleeper on Craigslist, but the leather was in terrible shape - sun faded and looking kind of sad.  But since it was in faded condition, I got a great deal on it (and it had never been slept on, the mattress was still in the original plastic).  I got some leather conditioner and polish and got to work:
You can see how dry the original (left) side is compared to the restored side

I did the right side only so I could show my husband how different it looks!

The leather was still soft, just really faded and dry looking. 

When I got it all done, it looked great.  I used a nice brown leather polish and a leather restoring product to keep it supple.  Lots of muscle to work all that into the surface, but the results were worth it.  I need to make some fun red pillows, I do miss the red in the room!  But it's soft and comfortable and looks fabulous now!  And as a bonus, it would match up with the living room furniture in case I ever want to do a shift in furniture -- my little red loveseat didn't go with anything!


Friday, June 22, 2012

patio furniture cushions

Getting the furniture built was only part of the whole plan - finding an affordable way to make the seats comfortable was another problem.  The plan is built on a standard 24 x 24 inch cushion, but even at Costco or Lowe's, the cushions were about 25 dollars each - and we needed 8 of them, so that would be 200 dollars for the cushions.  What to do?

When we moved from Indiana, we had a queen sized bed that we sold, but we'd also bought a foam topper because the old mattress was so uncomfortable.  We had that out in the garage, and when we got it out, we realized it was thicker than we remembered -- 4" thick.  I would prefer 6" thick cushions, but cutting this topper down was free!  We marked it out into 24" squares, and it was just about perfect.  We had to piece some of the last 2 cushions, but we got it all done.  Yesterday, I went out and picked up some fabric for the covers.

After making Leslie's owl purse, I realized I really liked the look of the fabric with the gold outlines, and I found some that was a similar print.  This one had a green background and a fun all=over print.  It was 2.49 a yard, and I bought 10 yards, for a little more than 25 dollars with tax. It's not a fabric specifically made for outdoors, so I know that it's going to fade and wear - but I also want to get another layer of foam on these, so I plan on recovering them again next summer.  It didn't take me long to whip up some simple covers - I didn't do the full box seaming, just took a piece of fabric, folded it in half, sewed around, leaving one side open, wedged the foam inside, then hand-stitched the back closed.  


I still have more wood filler to work on, hoping to finish that up tonight, then a final sanding, prime and paint.  While I was thinking of a deep red, now I've decided perhaps an ivory would work best. 
I do have lots of fun pillows so that's where the gypsy look can come in.  I think leaving them ivory might allow me to change the seat fabric a little more easily without having to match the color of the frames.

In other yard-related news, I saw another agave for free on craigslist, this one I had to dig up.  It didn't look all that big when I looked at the ad:


But it was pretty big!  And it was the hottest day this week, and Dale had to work, so I was on my own.  I dug and dug, and bled and bled (those points are sharp!), but I got it out.  The homeowner helped me pick it up and put it in my trunk, which I couldn't have done alone!  Here it is in the trunk:

"Feed me, Seymour!"

And here it is in the backyard.  It's beautiful!


Friday, June 08, 2012

Crafty time

My daughter is visiting - and we spent a day at the beach, and then exhausted ourselves yesterday with a full day of Disneyland -which was really fun, but we decided to do something less wild today.  I had bought fabric to make her a tote bag for her birthday in October, but then we moved and with things getting crazy, I never got it done.  So today, we got the fabric out, looked online for some inspiration, and sewed up a cute owl purse:


You can read a tutorial on her blog:  Lemon Squeezy

Tuesday, June 05, 2012

Patio Furniture progress

Dale and I worked on our patio furniture today - he got home early and so we made a lot of progress!


We got all excited when they started taking shape!


Pretty soon, we were overrun!

By the end of the evening, we had the frames all finished, and I've gotten one of them almost done with the wood filler/sanding step.  We ran out of wood filler and I needed more sandpaper.  

This was before we got the slats glued/nailed down:


And here's what they look like on the patio!


I am so ready to get them sanded/painted.  I've decided they are going to be a dark red after all - Dale and I were sitting out there brainstorming our ideas for the cushions - and I have about a zillion toss pillows, and I think I might stencil something across the front bottom bands.  Dale was afraid that a "barn red" might make them look too "farmer-ish" but with the eclectic assortment of pillows I have, I think it's going to look more gypsy.

And now, we want to make a coffee table for the group - so that will be our next project for the patio.

In about an hour, I leave to pick my daughter up from the airport - looking forward to the fun!

Sunday, June 03, 2012

Weekend Projects


This weekend, we got started on a couple of projects that we hope to finish up this week.  First - we ordered a new window for our bathroom.  When we originally demolished the bathroom, we were living under the illusion that we would get all the work done fast and wouldn't have time to wait for a special order window.  We pretty much hated the single hung window that we put in there - first, it opened right at waist level so the neighbors (whose kitchen is directly across from our bathroom) would have the tantalizing sight of us taking a shower, and secondly, the steam can't escape because the opening is too low.  So we finally ordered the double hung window in the same size, and this weekend, we pulled out the SH and installed the DH. 


Sadly, this is what the neighbors have had to look at since November.  Because we hated the window, we never put the trim back around.  Maybe we were hoping they'd be so disgusted by the window trim that they wouldn't notice our naked selves in the shower.


But - we got the window done, and all the trim done, and then the caulking and paint and touch up, and it looks lovely now! 

Not a glamorous job, but we're glad it's done.


The other project we started this weekend is some seating for our summer guests.  We love to sit outside in our back yard (I'd say on the patio, but that's way too fancy a name for the cement slab.  We have one chair and one chaise lounge, and a tiny little square end table.  So we want to make some more friendly seating.  We like the plans for the Weatherly Sofa at ana-white.com - so we got the wood and started building the sofas on Sunday.


<----this will
               soon be this----->


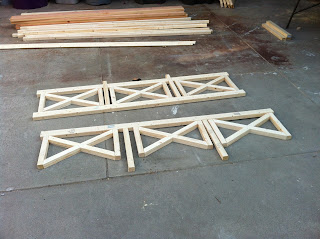
Those are actually 3 pieces - two sofas with arms and one armless love seat.  So far, we have the criss-cross motifs done:


And we've got most of the back framing done.


We're hoping to have some time on Monday and Tuesday to work, too.  After reading lots of reviews of the Kreg jig, we decided we should get one of those, too --  it really does make joining wood pretty much a breeze.  Here's Dale drilling some pockets for joining part of our sectional:

Because we are making this for our uncovered back patio, we figure it's going to take a beating for a few years, and so we didn't invest a lot of money in wood and supplies.  The wood and fasteners were just a little more than $100 -  what is going to cost are the cushions - but we've got some ideas for those.  When it's done, we're going to paint it white, although I am looking forward to the future when I get the patio covered with a pergola and I can make more of a Moroccan-inspired oasis, and I would love it a dark red!  We figured if we paint it, we can change the color and refresh it every couple of years, since the sun is going to really beat down on it and it'll need a new coat of paint occasionally. 

So that was our weekend.  Guest #2 comes Tuesday evening - we're excited to see Leslie!


Friday, June 01, 2012

Summer begins

We had our first summer visitor trying out the guest room -- my youngest daughter Hilary came for a week and we had fun doing the tourist-y things here in southern California:  Disneyland, Hollywood, San Diego Zoo, the Aquarium of the Pacific - and the beach. 


It was fun having her out!  We have another visitor next week - my middle daughter Leslie will be out for a week, then the day after she leaves, we have my best friend Eric and his partner Herbert out for a week!  It's going to be a fun summer!


The last day Hilary was here, I saw an ad on Craigslist for a free agave - it was huge! 


Here it is, planted with some iceplant starts.  It's a little beat up but will do just fine.


This weekend, we are going to work on a furniture project and replace the window in the shower - more on that later.  But in the meantime, we're just relaxing, and enjoying the summer!


Blogging tips