Showing posts with label windows. Show all posts

Wednesday, August 12, 2015

Vardo coming along


So we've been working slowly but steadily on our little vardo camper.  Last time I posted, we had just begun getting the two end panels on.  Well, we've made a lot of progress since then:
We got both sides framed and added the rafters.  These are notched into the tongue and groove ends for stability.  We also got the sides skinned with beadboard paneling:


And I got the door and window on the back end cut.  The "back end" is actually the front, but it's the end away from the trailer hitch. 

I added a little detail around the window while Dale was doing the plywood attaching on the sides.  For this window, I used the last remaining stained glass panel and had to cut/reassemble it -- here's what I had left:
Just a long skinny half.  I cut that in half - you can see where I drew a line with sharpie above -- and then I cut the lead with a utility knife. Lead is super soft and cuts easily.  Then I snapped it in half.


 I cut off some of the extra lead, and then cleaned off the cement that is used to weather proof it. 


I removed the center rectangles from one piece, cleaned out the channel, then slid the two halves together.


Then all I had to do was further clean up the lead, solder the joints and cement the new joins.  Then it was all ready to go!


So now I have a window for the door end of our little vardo!  I didn't show it here, but I also cut down that wide outer edge of lead channel, so I didn't have so much to hide in the window frame.


The other thing I did this week is get the bow window for the other end (mostly) finished.  I still need to put the last window in, but I needed to run out last night and pick up some hinges.  We still are working on ways to get it to prop open, but those are just little details to work on later.  Here's what it looks like so far:

I think I will make some kind of sloping roof for it -- it looks a little flat across the top.  A sloping roof will probably also make it a little aerodynamic, since this is the "leading edge" when we are towing it.  The window will be hinged at the top and open out from the bottom.  We'll also have to make shutters for this window so that the glass is protected while we haul it.  We're thinking something like this:

that, by the way is from a blog post here: http://paleotool.com/2012/03/12/travel-shutters/
There are a lot of great internet resources, including the blog above, instructables, other people's generous build journals and a wonderful site called Teardrops and Tiny Travel Trailers, which has a ton of resources on building methods.  We've gotten a lot of useful information there.

Finally, I also made frames for my two stained glass panels for the side windows:


These are ready to hang as well in their own window spaces, but I need to get the framing done around the holes before we hang them. 

We picked up the materials for the roof, so that's our next job in this project!

Saturday, August 01, 2015

Progress on the vardo

I thoroughly enjoyed teaching a workshop in Tennessee at the Tennessee Arts Academy - a first class job that was exciting and exhausting.  When I finished up my week there, I rented a car and drove from Nashville to Indianapolis to teach at the Indianapolis Museum of Art and also to spend some time with my grandson Parker.  We made lasagna:


He's such a lot of fun!

We got the basic box built for the vardo, and already we're altering our plans. Originally the ledge was going to be 12" -- but that looked large so we made it 10."  We also had put up some basic wedges to hold the ledge in place, but decided to cut out some curved wedges. 
We got the box built and also the back deck.  This platform will help make a transition to entering, and also serve as a place to put our camp stove and any other equipment.  We'll have to move the lights and license plate later.
We set it up on jacks so it's level and stable while we're climbing all over it.  We are going to probably add some jacks welded on later but for now, these work fine.


After we got the basic box and ledge done we started on the back wall.  This was exciting and kind of anxiety inducing -- all of a sudden, it seemed really huge!  Luckily, one of the online forums I joined to learn more about building these was super helpful, and it turns out we're right on track.  Right now the box and the one bar across the door are stabilizing until we get the sides put up.  We have the back end up -- or at least 75% of it - it got dark before we could finish.  It's cut, just need to get it attached.


 We have a couple of things we want to splurge on, even as we try to keep costs/weight down. I bought two stained glass panels on wayfair.com for our side windows:


These were about $115 each, and I will build frames around them for our side windows. I also have a piece of leaded glass in the garage that I got off craigslist awhile back for about 10 dollars, and that will be the center of the bay window.  I'll see what I can do for the front door and I think I want to add a small window next to the door as well.

So we're having fun -- but we're not in any rush. I'll get the stained glass this week and then we'll know what size holes to leave for windows.  We're also rethinking some of the other parts -- maybe redesign the mollycroft so it blends more into the roof -- it's so tall, I don't want to have too much wind resistance!  I ran across this plan and I think we can do this instead:


On top of all that, I had gallbladder surgery yesterday == ouch, but I'm glad that thing is gone!  it was no fun dealing with that the past few months.  Easy laproscopic surgery but I'll be sore a few days.  We'll get back to business in no time, though!

Sunday, June 07, 2015

Catching up -- part II

I've simply gotten out of the habit of blogging. So I am going to do yet another catch-up post and highlight a few of the smaller projects we've been doing in the past year.  Even with my best intentions from January, I didn't continue, so now that it's summer and I don't have as many things on my plate, let's see if I can get back in the swing of things.

To get ready to look at catching up, I looked through the past couple of years of posts, and realized that I did a lot of little things that I never added in.  One thing that made a big difference was taking out the last two big, ugly air conditioners.  We do have one still in the bedroom, but the other two (one in the kitchen and one in the guest room) were not only ancient, but didn't even work.


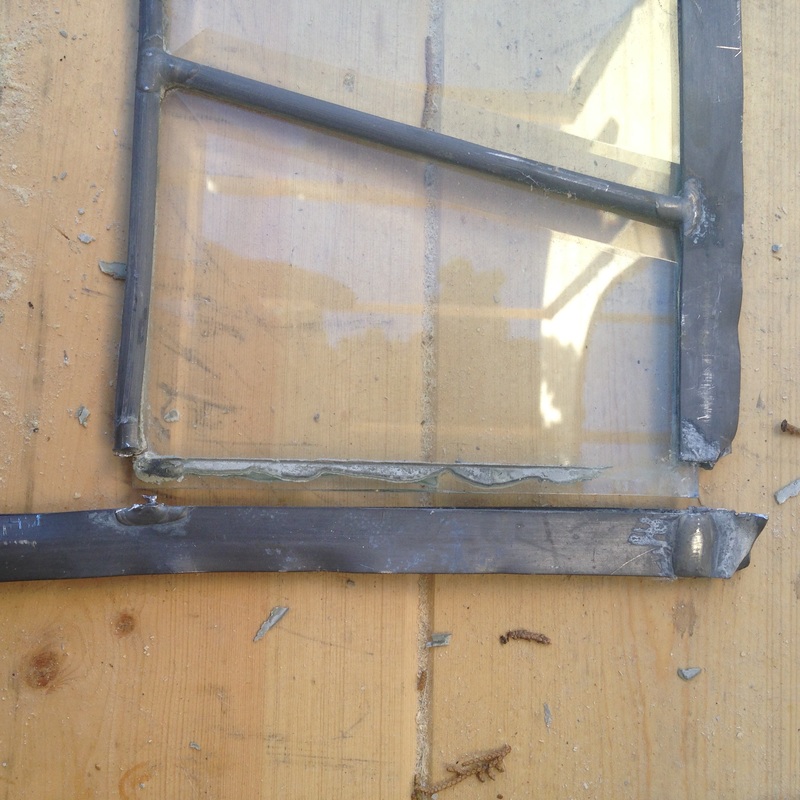
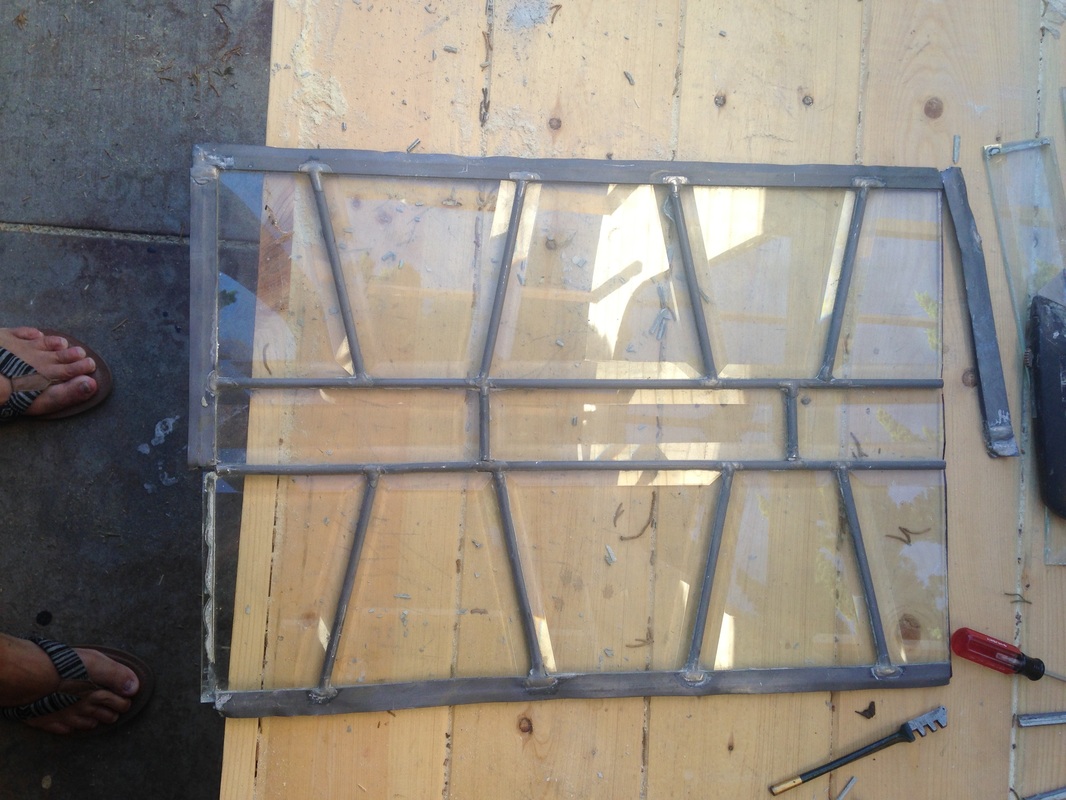
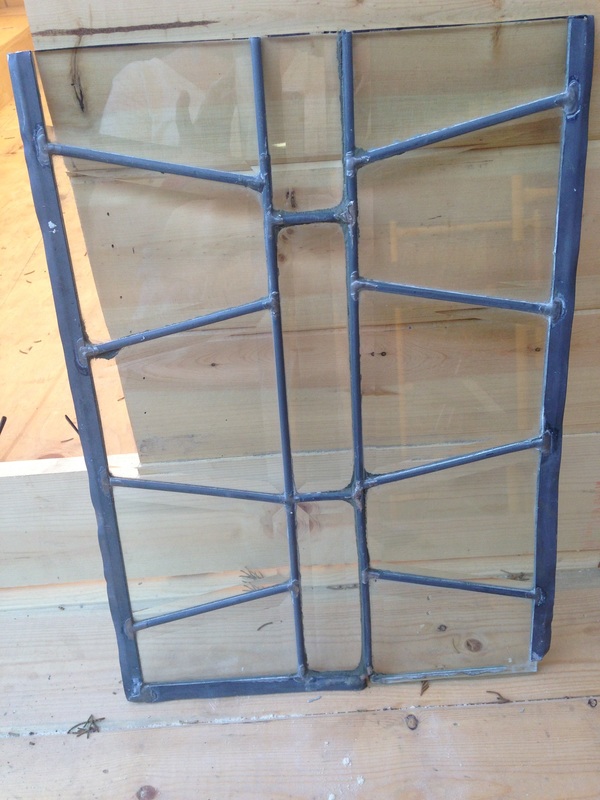
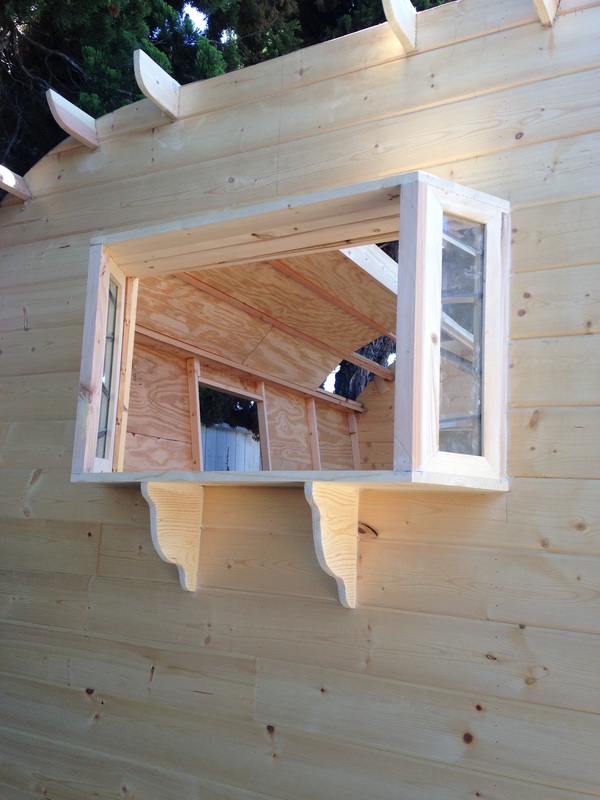
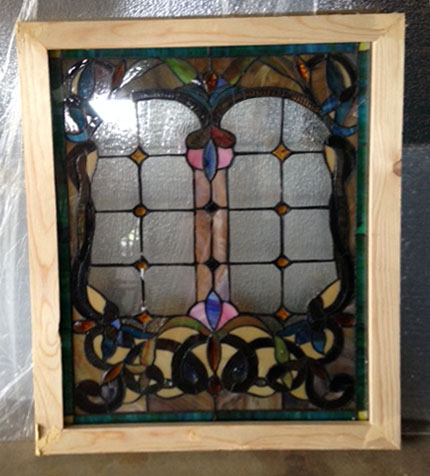
The first one I took out was in the kitchen -- just had HAD it one day and I had a large sheet of glass, so we wiggled and jiggled the old behemoth out of there and reframed the open space.  I thought I had taken pictures.....but here's one of the end result.


It's so nice to have more light coming in, and to not have that unsightly AC unit there.


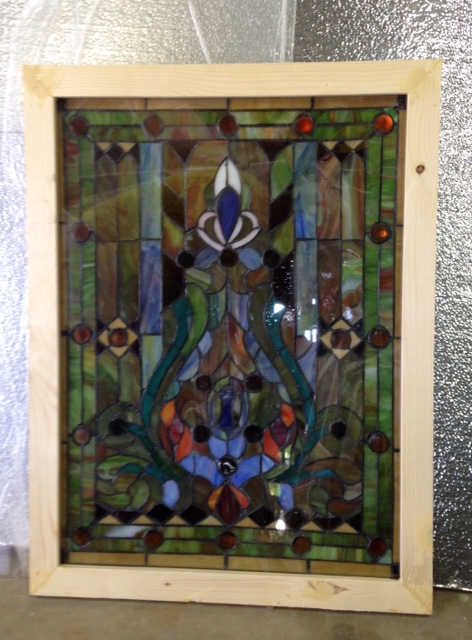
The other one we replaced was in the guest room.  We did this one later,  and we decided to use one of the other two glass panels that we got when we updated the front door.  So I like this one a little more.


I still have one more glass panel, and may replace the kitchen window with it, especially since sometime this spring one of the panes in the current window developed a crack somehow.  So I need to either replace that panel or just replace the whole thing.


The other big thing that we've done in the past year is to paint our bedroom.  Our bedroom is the last room that had the original beige paint.  We have a lot we want to do in here, but most of it involves adding a bathroom on and reconfiguring the room. So we were thinking that doing anything in it's current state would be a waste of time.  Then we were lying in bed, thinking yet again how much we hate the beige, and decided we should just paint since it's only 20 bucks or so and we'd feel better about it.


We wanted something fun and bright, so these are the two samples we got.  We did a quick poll on Facebook and we ended up using the one on the right.  I'd looked through a lot of Pinterest pics to see how each color would look in a room with furniture similar to ours, and we decided to go with the brighter color.


Here's what the room looked like before we got started:

Dreary, even during daytime.  We pulled all the furniture out, scrubbed everything down, then got it painted.  Soon enough - it looked so much better!

It's so much more fun to wake up to this!

One thing we did differently than in the other rooms was to not add the crown up along the top -- because we are going to redo this room eventually, I didn't want to go through the expense and hassle of putting crown molding up, but we did run a piece of molding all along the top edge about 5" down (the same as we've done in all the other rooms), and paint it and everything above white and glossy, so it has a bit of a look of a finished molding.

You can see it along the top edge here.  I also took both of the bedside lamps outside and spray painted them, from the brassy finish they had from our house on Bosart, to a nice flat black that looks more like the bedframe.

This isn't a very large room, and we've got a king sized bed in it.  So just putting this brighter color of paint has made a huge difference and made it feel so much fresher!


The other thing we did when we fixed up the room was to put a box over the ridiculously large cable unit. We built a box from some leftover plywood, then painted it to match the wall.  Not only is it large and bulky looking, it has an orange flashing light that is irritating, so this way, the box covers the whole thing and it's not as noticeable.


I would also love to take the AC unit out of the window, but with the past two summers, we're grateful to have it on hot days.  I talked with Dale about taking it out of the window and embedding it in the wall so we aren't taking up one of the windows (and maybe enlarging the window), but again, since the long-term plan for this room is to add on and make half of this room a bathroom, we don't want to put any big work into it.


Other small things we've done around the house ---
Added a ceiling fan in the living room (to replace the stupid "boob" light we had in there),


Added curtains to the patio pergola -- we got these at IKEA - some inexpensive 9.99 panels, and a wire system to hang them on.  These have been great to keep the sun at bay, and makes it really nice in the afternoons when we want to kick back and relax on the sofas --


and we got a hot tub! 

We were keeping an eye on Craigslist and one day someone had one for free -- it's a Softub, and I read into them and realized that it would be perfect for our situation - our electrical box is full and we can't add a 220.  Softubs take a regular 110 outlet, and they're super lightweight to move and take care of.  So we missed out on the one for free, but we kept our eye out and ended up getting this one for $300.  We use it pretty much every day!  We did have the motor go out last month, and that was the real test -- the repair to rebuilt the motor was $600 -- did we really want it - and we decided that yes, it was completely worth it.   I love going out there first thing in the morning and getting caught up on FB and email and everything else before getting in the shower and getting ready for the day.  And I think it's also helped my skin feel so much better.  We have the water treatment schedule down and feel great about the whole thing - so we're really glad we got this!

OK -- so that's a lot of catch up  to do.  I have more things that I've been doing, and this week, we've been working in the yard, so I can do an update on how our front yard looks two years after our initial lawn to garden conversion.  I'll also get caught up on vacations and projects -- lots to write about!

Friday, June 29, 2012

Last Little Project Before Guests Arrive

We pick up Dale's cousins tomorrow morning at 8:30 am - we have 2 adults and 2 little girls coming to stay with us, so it's going to be busy around here!  We've got the house all tidied up and ready to go, but I wanted to get one more little project done.  After getting the dutch door done, the rest of that window looked kind of sad, so I wanted to spruce up the shade and add some fun.

I took down the window shade and placed it on top of my fabric, a nice blue plaid.  OK, so my kitchen is yellow - ick - at least blue kind of goes with it.  (Ignore the ugly floor where I am spread out my fabric). I have a cute topper over the kitchen sink that I made, predominantly blue because it was in a blue bathroom at one time.  Anyway, I ironed the blue plaid fabric and then folded it over the shade, and ran it through the machine. 

Then I slipped in the lower bar and stitched the hem closed.  Easy enough.  Reattached it to the roller, and that was that.  When I hung it (with assistance of course), it looked....kind of bare.  I added a tassel (from my big bag of tassels!), but still,  it needed more. 

So I picked up a curtain rod and hung it above, then tore a bunch of strips of fabric and ribbon and half-hitched them over the rod.  This is what the topper over the sink looks like, so they match.


Ok, that'll do!  I do like this (even though the brackets don't match the rod, it's not that noticeable from the ground!  I had to use brackets that extended out from the door more than the ones that came with the rod); I'll probably do the same for the other two windows in the room later.

The shade is behind the fringe, ready to pull down on the hot late afternoon sun.  I was SO tempted to paint this room a cornflower blue today, but it was a hot afternoon and I had a 4 pm appointment to look at some doors on Craigslist (some french doors that might work to replace the slider in the living room).  I'm glad I didn't, I'd be exhausted right now.

OK, ready for company!
Blogging tips