Saturday, March 10, 2012

More yard work

For all the work we are putting into it, our yard looks like crap.  But it will get better eventually!  This morning we got up early - someone had listed free bamboo on Craigslist and I didn't want to miss getting some.  It was perfect for along the back wall, so we called to get an address and took off.

We went to a house that was completely overgrown with bamboo - it was everywhere!  It's certainly a caution - this stuff will invade everywhere if steps are not taken to contain it.  I wish I'd taken a photo - it was pretty spectacular.  But it was also gorgeous - this is black bamboo, and the stalks are ebony black after 2-3 years, and mixed with the light green foilage, it's gorgeous.  So we brought our shovels and got digging.  A couple of hours later, we had a big pile of bamboo and sore arms.


Then we had to dig through our root-infested yard - the avocado tree has roots that run right at the surface and about 12" deep - once you cut through those, you're fine, but it's pretty exhausting and our arms were already tired!  But we got it done, and we're really happy with how it looks.


After we sat down with cold drinks and congratulated ourselves on how nice it looked, we took a look at the smaller of the 2 avocado trees - and decided to cut that sucker down and get more light in that corner of the yard.  The main avocado tree is lovely and plenty big enough to cast a nice filtered shade over the entire yard - the second, smaller one is just unattractive and creates a jungle in that corner.  Here's what it looked like when we closed (it's kind of hard to see that dark corner) -


and what it looks like today.  We still have to dig up the stump, but turns out that weedy looking tree in the corner cleaned up kind of good!  I don't know what it is, yet, but I think I'll keep it.  (*sigh* -- the grass is completely pitiful).


Oh, and here's some company we had while we worked outside today:


We have lots of lizards out there!


Our bird of paradise must not have minded all the man-handling it got when we moved it - all three segments have blooms on them!  The agapanthus we got free on Craigslist a few weeks ago is also looking great.


So, we sat back down with another cold drink and talked about what we were going to do for dinner, and Dale says, "Oh, what the hell, let me get started on digging up that camellia -  and you can check out that stump" so back we went.  We only got halfway done with that last part, though - too tired, so we'll finish tomorrow!  Thank goodness for beautiful California weather --


Tuesday, March 06, 2012

New York

So - I went off to a conference in New York City.  I love New York (I love big cities - New York, Chicago, Los Angeles!), and besides the absolute joy of meeting up with my art educator colleagues from all over the US (and staying up til 2:30 am giggling like kids at camp!), I took advantage of going to the major museums while I was there:
One of my favorite artists - Charles Demuth - and one of my favorite paintings.  Going to the Met is like looking at Gardner's Art Through the Ages in person.  Every room has something my AP Art History students would have studied.  I could stay there for hours.  But...instead, we hopped on a bus and took a ridiculously long ride to visit the Cloisters - the medieval gallery at the other end of Manhattan:
I love a ton of stuff there - but to see the Unicorn Tapestries - oh, it takes my breath away.  Also - the Merode Altarpiece, which was so wonderful to see up so close --oops, up so close that I set off the alarm (twice!).  My friends totally ratted me out to the guards.

Also visited MoMA and saw a ton of spectacular artwork, including this piece by Doris Salcedo:

This is just a single part of a series of niches cut into the wall, with women's shoes inside, and animal skin stretched over and stitched to the wall. It was gorgeous, evocative, sad...just beautiful.  But my FAVORITE -- really FAVORITE thing at the MoMA was a Cindy Sherman retrospective - the entire 6th floor.  Oh, it was magnificent!  Loved it!! (couldn't take pictures there - but how silly is that - they're photographs.
Then, the Guggenheim, which had a show of John Chamberlain.  It was great, but what I LOVED were the Kandinskys!  To be up so close and look at them --makes me want to paint right now.
It's so inspiring to be around all the wonderful artwork and art friends and discussing art education issues.  I came back with a crappy cold - thanks Kris! - but ready to get caught up with my grading and to make some art!  Oh - and Dale did some last minute wiring and so I came home to a house full of extension cords and a blown breaker, LOL!  That's the kind of stuff we take in stride around here --

Monday, February 20, 2012

Bus Scroll Art project

I love my new Southern California affiliation.  It's exciting to think that we live in one of the biggest cities in the US - one of the most famous cities in the world. It's fun to watch movies that are filmed out here and realize we know where lots of places are.  And, as a big detective mystery novel reader, there are TONS of great mystery series that are based out here, and whose plots revolve around places whose names I've read for years, but now have been to.  So in the spirit of my honeymoon love for LA, I decided to create a "bus scroll" project for my Southland home.

I've seen vintage bus or subway scrolls on ebay and in decorating magazines - the signs that change to indicate where the car is going when it pulls up to the stop.  But I can't spend the money on the authentic ones I really like, and I ran across this great project on a blog called Mama With a Dash of DIY Drama.  And it's budget minded (my polite way of saying CHEAP!) and that's right down my alley.

So the first thing I did was make a list of streets and places in the LA area that bring to mind some of those mystery novel associations - as well as well-known LA streets.  I made this on a Word document, putting in a black shape and then typing text into it.  I used Roadway font and varied the font size and sometimes bold, sometimes not. I've seen others that used a variety of fonts, but I like the uniformity.  Then I saved it as a pdf file, and sent it online to the local Staples copy center.  Choosing an engineering print, I had it printed out at 24" x 36" for 2.99.  Which was my total cost for this project (yay, cheap!).

Other places have done this project mounting the print on a stretched canvas, but I scrounged around in my garage - which I spent most of Saturday cleaning - and picked up an old piece of plywood paneling that I cut to size with a utility knife, then sanded the edges. I liked the old flaked look of the paneling for the background.  I trimmed the print to the black edges, then spritzed the back of it with a spray bottle so the paper would not wrinkle as I glued it to the wood.  I watered down the glue and spread it all over the plywood with a paintbrush, then applied and smoothed down the print.  I rubbed it a bit with a very slightly damp rag, so it would adhere well and also to get it to look a bit aged.  Because the plywood was thin and there was a lot of moisture added with glue, I sprayed the back of the plywood with water so that it would not buckle. 

Now it's all dry and I love it.  I have a great cabinet in the living room that it's going to sit on top of -- we have to get some glass cut for the cabinet so I can fill it and get it all 'styled out' - more pictures later of the finished look!

Sunday, February 05, 2012

Yard work Sunday!

While the rest of the country is watching the Super Bowl, we spent the day working in the yard.  Actually, today was supposed to be a drywall day, but last night I saw an ad on  Craigslist for some free agapanthus if we dug them up, so we started off with that.


And after we got those put in the ground, Dale looks at the bird of paradise that is overgrown and hanging over the path and says, "maybe we should go ahead and dig that up while we're out here..." and THAT was a major job!  We had to dig a HUGE hole around it, then divide it and replant it.  Our yard has a lot of trees --too many! -- and there are roots everywhere, which makes it even more of a challenge.

So we got that divided and transplanted, and cleaned up.  Looked around, and realized how much bigger the backyard looks now -- yes, it's still a hot mess grass and weed-wise - but we'll get that going soon, too.  We also took out two small volunteer trees - more like overgrown weeds, and that opened it up. 

So we came inside (and I had to clean the sliding glass window so we could admire how large the backyard looks), and we sat down, had a nice cool drink, and started talking about how badly the lemon tree was overgrown, and maybe we should just cut it down and get a dwarf lemon.  So Dale puts his shoes back on, and says, "I'm going to go out and trim a few branches right now."  So back out we go!

After digging, sawing and raking all afternoon, we're beat!  But the yard does look lots better.  Oh, if only I could afford to get a pool put in before summer!  Dream on!

Friday, January 27, 2012

Bathroom vanity

The bathroom is moving s-l-o-w-l-y (I snicker to think how quickly we thought it would go), but I am making progress in between all the other duties of life and work.  One of the things I knew I wanted in the bathroom was a furniture style vanity - but I am way to cheap to spend 800-1000 dollars on one.  So I kept an eye out on craigslist for a good piece of furniture - I wanted something with a curved front and a little bit of vintage charm.  And it had to be between 40 and 48" wide - which was the hardest part.  I found a ton of stuff in the 55-65" range.  So when this little dresser came up I jumped on it.


Sixty bucks, that's my kind of price! It did have problems - a long split across the top, and the handles had been changed and there were holes where the old handles were.
    
 The left side had some deep cat scratches at the back end, and there used to be a mirror attached, so the top had a 3/4" gap at the back where the mirror had been attached.  But no problem that I couldn't fix!
And you can see in the pictures above, the top was stained and pretty nasty. 
So the first thing I did was unscrew the top and glue and clamp the split.  And then we pried the back off the whole thing - which we would need to do for access to the back for plumbing.  And when we did that, it solved the gap issue.  I sanded the cabinet and filled the scratches, then gave it a nice coat of satin black paint.
I also refinished the top - sanded and stained it back to the original color.

Now I needed to modify the top three drawers to allow for the plumbing.  The middle drawer needed to be shortened to allow for the water hookups and the drain going out, and the two top drawers need to make room for the drain from the sink.


The middle drawer was easy enough, just took 4" off the back and set some new stops so the drawer doesn't go in too far.  The top two drawers took a little more thought and planning.  I needed to bring them in a little but not right to the front, and I didn't want to weaken the drawers by removing the front dovetails, so I started 5" back from the front, and cut a rectangle out, reusing the old pieces I cut out.   I did take a picture of the back side of the entire piece, but it was getting pretty dark out and it wasn't the greatest picture.
I filled the holes in the two large drawers, and then painted a celtic interweave design on the drawer fronts.


I lightly sanded the stenciling then gave the entire piece 3 coats of spar varnish, which is used on boats.  Since this is going to go into a room full of moisture, I wanted to protect the wood.  The top got an additional 5 coats of varnish.  I also used steel wool on the pulls to bring out a little of the brass - although I liked the old patina so I didn't polish much.

We still have to mount the sink to the top and add the faucet, but for now, the main part of the cabinet is done, and I'm happy with it.  The oak finish was so pretty didn't want to cover it all up (originally I was going to paint the entire bottom along with the drawers), so we decided to use a fairly dense stencil.  I had a hard time picking one out - I was leaning towards some florals but Dale wanted something a little less "girlie."  I think the final choice is perfect for us.  I think it's going to look stupendous against the white walls and marble floor, warming up what could be a pretty cold room!


Friday, January 20, 2012

New Chairs

Several years ago, I bought Dale a new recliner. His old one was horrible - it reminded me of the one Frasier's dad had - but he loved it and wouldn't get rid of it unless I got him a new one.  The new one was a beauty - tufted and super large and comfy, but lately, it's been looking kind of sad.  Again, he hated to part with it, so I looked into getting it reupholstered.  I checked on Yelp! and found a highly rated shop, got estimates, all ready to go.  I was only hesitating because they said it would be 3-4 weeks in the shop, and he hated to be without. 

But I'm glad I hesitated - because I was scouting through Craigslist (can't stop myself!) and I found an identical chair for $68!  A bargain, because this chair originally cost close to $1000.  The upholstery on this one was in even worse shape - cat scratched (although when we went to go check it out, I can't help but wonder if they had a lion instead of a cat!) but the chair itself was in great shape.  So now we have a matching pair - I used to have a pair of wingback chairs that I loved, but had to part with when we moved. 

We picked out some beautiful upholstery fabric with an all-over leaf pattern that goes nicely with our new couch.  And the best part of all, since the chairs were so big, they rushed to get them out of their tiny shop and were done in less than 2 weeks.
(Ugh. I had to block out the background on this picture because it's a mess of drywall stacked against the wall and the old furniture that I've just listed on Craigslist. ) These chairs are so comfy!  Deep and wide and all that tufted comfort.  I just want to be sure we keep them up - although the price to get them redone ($350 each) wasn't as bad as I had expected, and because we love the shape of these, I'd do it again.

I'm thinking of painting the living room.  Thinking of black.  But - before I do, I need to replace that drywall back there with a wall of shelves for my books, which are still stacked in the guest bedroom in boxes. 

Sunday, January 08, 2012

another furniture piece

While Dale worked on running electric (up the ladder, into the attic, hey, turn off the power, back down, repeat), I reworked a table that we had in the living room.  I actually got this table when I was living in apartments, almost 20 years ago, I pulled it out of a dumpster!  I went to throw my trash out and I saw it down in there - I had to climb in and drag it out.  It's been a handy little table, about 3 years ago I painted it black to cover the badly stained top - but it needed to be freshened up.


So while I was in between helping out with electrical, I sanded the top smooth, sanded edges to give it a weathered look, painted a compass rose on the top, sanded that a big to age it, then gave it a nice coat of stain and several coats of poly.

It looks so much nicer now!
I also refinished the bathroom door this week.  This door had plastic laminate contact cemented to the backside.  We wanted to keep the original doors because they're really nice, so I pried up all the laminate, removed some plywood that they used to level the insets, sanded it all down and added a strip along the back edge.  We are going to convert the bathroom door into a pocket door, and this one should be about an inch or so wider so it doesn't pop out of the pocket.  The additional strip won't really show, but I added a strip of wood and sanded it even, and added filler in where the old door knob was.  It looked pretty rough!


I sanded it all smooth, and then primed it and gave it two coats of nice white enamel.  For a finishing touch, I painted "Bath" on the top panel, which will only show when the door is closed.


Well, we didn't get the pocket door done this weekend, but it's the next project on the list.  And the door is ready to go!

Oh, and see all those baby shoes on the shelf? Those will go in my bathroom, too.

Wednesday, January 04, 2012

I'm beat!


So I choose one of the hottest days of the winter to go out and dig up all the roots around the eucalyptus tree!  


It looks so much better - needs grass growing but just getting the gunk out and digging up roots makes it look a zillion times better.

We've also cut the ivy off the tree up higher.  Still have a ways to go -but now it is dying off and hopefully by spring I can get the majority of it down.  It's to the point now where I need to use a ladder to reach it.


Just a reminder of how it looked before (and this was after I cut a clear ring around the trunk):


I'm sure all the neighbors are not appreciating this yet, since the dead ivy leaves are starting to fall and blow around. I try to keep them raked up but it's going to be a losing battle. 

Monday, January 02, 2012

Studio - cleaned up


I finished painting this morning while watching/listening to the Rose Bowl parade - I really like the gray because it's such a sunny room, and this makes it feel cool and relaxing.


Gray is a nice neutral that makes the colors of the artwork pop.


 Another reason I want to get it all cleaned up is so that I can some work done in here! 


I  have a lot of messy things in here - Dale wanted me to get closed doors on my shelves since they're usually full of oddball things, but that limits the size of what I can put in them.


The color is Polished Silver by Valspar.

Sunday, January 01, 2012

Now to change up some color around here...

When we bought the house, it had been professionally painted - walls, trim, ceilings - which made it feel clean, but all the walls are this ghastly tan color.  I hate it.  But I have many other things to do, so at least we know they're clean.  But the tan is getting to me, so I started painting my studio this evening - a nice silvery gray.
Dale hates gray.   So he came home, saw the can of paint and says, "oh, now it's ON."  He wants to paint the living room - which is also the same gross shade of tan.  But I can't decide what color to paint it - we tend to like pretty powerful colors.  I'm contemplating black or a deep navy blue - but I don't know if we have enough white trim out there to pull it off.  The white in the studio - the wainscoting and the trim and all the furniture - make the gray a definite neutral.  I would like the same gray in the bathroom, but since Dale hates it.....

Anyway - got one coat on the walls tonight - tomorrow I'll finish up and post some pictures of the finished room with all the paintings hung back up!

Sunday, December 18, 2011

Maybe we can take showers tonight.....

What a weekend! We rented a tile saw Friday  night with our overly optimistic thoughts that we might be able to finish all the tricky cuts for the wall tile and the floor in time to return the saw when the rental place opened at 9 am the next morning - which would give us a a 4 hour rental instead of a 24 hour rental - but working until midnight, there was still plenty to do the next morning.  But - by 9 pm last night, we were grouting!


Love, love, love the marble "rug" in the shower floor.  The bench on the right is going to be great, too. 


We're been in this house for 7 weeks - and maybe tonight we'll actually be able to take a shower!  Actually, 7 weeks doesn't sound that long until I think about the daily bathing using the kitchen sink --


The long view shows the undrywalled walls, wooden floors and the janky shower curtain we'll be using until we get shower glass installed - which won't happen until January!  We'll be leaving in a few days to go back east for Christmas -- I wanted to be sure we had a semi-functioning bathroom when we returned!

Thursday, December 15, 2011

Finally....starting to tile

OK -this is getting kind of ridiculous - between Dale working overtime and me finishing up the semester with meetings and grading, we just weren't getting anything done at all.  But finally this week we have the shower pan poured and now it's tile for awhile!
Hard to take a picture this evening - the tile is bright white and I am hoping to get the walls done tomorrow morning.  I have a few tiles that I need a wet saw to cut, so I am just leaving those until I rent one this weekend (I need one for the floor), but I should have all the wall field tiles done.  I am hoping to post a picture this weekend of a semi-complete shower.  The room still needs drywall and a floor, but what I am really wanting is a finished shower!

Tuesday, December 06, 2011

patiently waiting....

Oh, bathroom, when will you ever be done?  I spent a little time this weekend - while waiting for various things to dry - fixing up a couple of display boxes for this great collection of vintage porcelain and ceramic baby shoes that I have. 

And then, of course, I could not find the box with all the little shoes in it.  I think I have about 35 of them.  I may need more shelves....


While dismantling the previous bathroom, I saved the drawer from the vanity.  I also had an older small drawer that I added a fun decorative knob to.  I found some scrap wood from the scrap wood pile (which is kinda enormous right now) and cut some extra shelves to fit.  The larger drawer had really horrid floor tile stuck to the bottom and I could not pry it out, so I glued some pages from a vintage music book to cover it up.  So these are going to go on the wall in my future bathroom. I have another drawer out in the garage to work on still.  Who knows, maybe I'll find the baby shoes by the time the bathroom gets finished, which appears to be in the not-to-near future.


Monday, December 05, 2011

Table makeover

I have been scouring Craigslist for a dresser to convert into a vanity for our bathroom, but we need a pretty specific size, and I have some things on my wishlist for it (curvy front, long legs, drawers on each side, not just down the middle), so nothing's fit my requirements yet.  However, I did see a kitchen table (another thing I've been looking for) - and the price was right - FREE.  So Dale and I drove over & picked it up on Saturday morning. 


 It's a pretty small round table (42" diameter), but with the leaf in, it measures closer to 5', and so that works for our kitchen. 


 It's nice enough oak with a claw foot pedestal, but the top was in real rough shape --


So I took the sander to it and got the top all sanded down to bare wood.


Painted the pedestal a nice satin black (along with the apron of the table)


Projected an image of a French Chocolate ad from Graphics Fairy on the tabletop.

(this is not my original idea - I am copying from a table I saw on another blog I read: Red Hen Home)


Painted this with black acrylic paint --


Distressed the lettering a bit with sandpaper, then gave it two coats of Antique Walnut stain.  This is the first coat going on --   


Second coat finished, and first of 6 coats of hand-rubbed Poly.


Put it back together and now it's in my kitchen!


Sigh. It looks so nice, it makes the kitchen look even worse!  I think I need some black chairs to go around it - maybe an assortment of mis-matched chairs with matching fabric seats, all painted black.

Shower progress

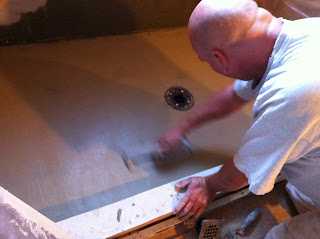
Arg - with all the power outages caused by winds out here in SoCal, Dale was on-call this weekend, so the planned progress with getting the shower ready to tile was delayed - but he did get an initial layer of the mortar bed down.
 
He was just getting ready to do the final layer when they called him to work.  I sure hope we get a shower soon!

Thursday, December 01, 2011

Tree in front of the house


The weather is still nice in sunny Southern CA, so I'd rather be working outside than in - besides, I have a TON of grading to do and I need a physically satisfying job to take my mind of it all!  So I decided to start tackling the tree in front of the house by the street.  With our plumbing woes of a couple of weeks ago that revealed that we've got a massive amount of roots in the old pipes, the plumber said that some of the main culprits are the ivy on the ground and growing through the tree.  Plus, that poor sad tree is covered in ivy.

This is how it looked when we closed on the house.  The ivy in the planting strip will have to be dug out, but for now, I'm going to start liberating the tree.


Today, I cut a strip around the entire tree of ivy vines and branches.  I had to saw a bunch of them off.  Luckily, this is a type of eucalyptus tree that sheds bark, so once I cut through the vines, it was relatively easy enough to pull them off the tree.  I am hoping that cutting a ring around the tree will help the ivy above start to die --- but I don't hold a lot of hope in this theory -


I also have to cut and clear years and years worth of vines, grass, droppings, eucalyptus pods and McDonald's toys from the base of the tree.  Oh, and dog poop.  One of the downsides of having a messy yard is that people apparently don't think they have to clean up after their dogs when they poo by the tree -- and really, who'd blame them?  Oh yea - ME.


So now it looks like a lollipop with a big green top:


Here's the neighbor's tree.  Yep, this is how I want it to look.  But it's gonna take some time.  And loads and loads of trash. 

baby steps!
Blogging tips